Wednesday, September 22, 2010

A Sneak Peek...Imagine


Well I did it. I purchased the Imagine at the HSN launch on September 14th. I didn't feel any buyers remorse but at the same time I really couldn't justify buying it. But it is here and I LOVE IT! I love just putting one piece of white paper down on the mat and just cutting multiple colors and patterns...no making sure I have placed my scraps in the right spot so that they cut correctly.

Oh don't get me wrong, I will still use my E, especially since my Gypsy Girl does not work with my Imagine, yet. And I can't cut thick chipboard with my Imagine...it's a printing issue. But I was really excited about one of the carts I received...Best friends. It is the cutest cart ever!

So I used it to cut my twin and used StoryBook to cut the title for my new blog header. I haven't been able to take a proper picture of it. I need to get proper lighting. So until then, here is a sneak peek.


Saturday, September 18, 2010

Here comes the...

Wow has it been this long since I have posted? I have been busy in my other world, running. I am training for a 60 mile walk benefiting breast cancer. I'll post more about that later. But I am here to show you my latest creation: wedding invitations. I have never done them before and I was quite nervous but I think that came out great.

I learned alot about wedding invitations these past few months. I found some great places to get paper. One is The Paper Source and the other is California Paper Goods. I highly recommend both of them. The Paper Source opened a store in Houston so I will probably use them more...however I probably spend more in gas than I would shipping...so maybe I need to rething that idea. I got swatch books from both of them for the future. I plan to make more of these. I don't know for whom but hopefully someone soon. They were fun to make.


I also lined the inner envelopes with paper. Did you know there were A7 and A7.5 envelopes? I didn't until now.

Now I need to figure out how to make menus and programs. I can't wait!

Friday, April 9, 2010

Quick Bag and Card

I have been on a small hiatus and not doing much traditional scrapbooking. I have been working on wedding invitations for a friend of mine. I finally have my printer working but come Monday, my laptop is going to the doctors. But in the meantime, I thought I would share a small project that I did in thirty minutes.

I bought an egift card online and needed something to use as a gift bag. What better reason is there to use Tags, Bags, Boxes and More cartridge . I made the bag in both black and pattern paper. I thought it would give the bag more stability. I then used my Cropadile to make a small hole in the bag. My butterfly embellishment had a wire knot in the back and required me to be able to put it through the bag so that I could glue it to the bag.

After making this very small bag, I made a very quick card with my Forever Young Cartridge. I have to tell you, that I can't wait to use this card more often. I bought it before I became busy with my other projects but I can't wait to use it on more projects. Believe it or not, the card is only three inches high. I told you it was a small box. I wanted to make sure it fit into the box so I had to make it that small. I don't know if you can see if very clearly but I added some small pearls to her dress. I can't help but put bling on cards, no matter how small the card.

Saturday, February 6, 2010

Flight of the Butterfly

Well the good news is that my laptop seems to be better except I can't print. So I have to take some time to do a whole system restore. Maybe I can do it sometime next week. The bad news is that I have only finished one more page in my baby album. I went to a crop this past weekend but I really never get much done. I talk too much.

So here are the pictures of the second page using the template I created on the Gypsy. Now these templates do not take any welding or fancy stuff on my Gypsy. Which just proves, if you don't feel you have a creative bone in your body, you still have many uses for the Gypsy. You can use it to create templates and then you just plug and play your images. You will notice the similarities between this page and the frog page.


It is pretty scary when you have enough scrapbook stuff in your arsenal that you can create an album. I think all I bought was solid cardstock for this project. I love pearls on pages, flowers and any kind of bling. But remember, I am trying to keep this one simple. So I found these tiny flowers at the back of a flower drawer. They are metallic and I think the colors go well with DCWV paper that I used from the Sweet pack. Oh and by the way, if you also digital scrap, DCVW has digitized their papers! You can get this digital pack here. I am really contemplating buying them. I do a little digital scrapping. I would love to do more.
So most of the Sweet paper will be covered because they are just photo placement holders but I just don't like putting blank boxes but that is just me. I placed a pearl in the middle of each flower. I was going to do small brads but to me, brads take so much longer than self adhesive pearls.

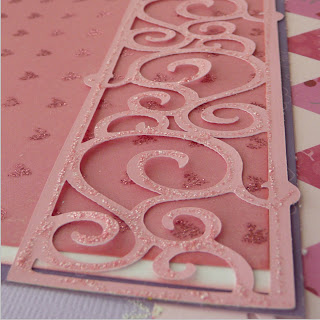
Because the page looked so bare to me, I decided to weld two swirls together from Home Decor cartridge and cut it out and used the negative as a template for the pearl placements for the flight of the butterfly. I had to be careful because sometimes the negative was not wide enough to fit the pearl through the cut so I had to gently pick up the template in one corner to place the pearl.

Because the spacing of the butterflies and the photos was different for each page, I had to make to separate templates. But it helps to have the flip feature on the Gypsy because I just flipped the first one and then did small manipulations to make it conform for the second butterfly. And yup, I did it all on the template I created for this series of pages. I love that I can reuse a template over and over again. Especially on album for a friend. I have a girl, so you can't ever have enough pearls, flowers and gems. So the next, and last, page using this template has crowns. I see lots of colored gems and jewels all over the page. I just need to find the time. This weekend our goal is to paint the guest bedroom, the hallway and the guest bathroom. So it doesn't look like any scrapping will be done this weekend. Oh and I have to finally put up the Christmas decorations that have taken over my dining room.

Wednesday, February 3, 2010

Tuesday Treats is Open!

I am so excited! Tuesday Treats is open for business! And this weeks treat is amazing! Mya did a great job on her video and project. If you want to see a pro in action, hop on over to TuesdayTreats. Each Tuesday there will be a new designer sharing their talent.

On a sad note, my laptop is sick. :( I am online daily with tech support for windows vista. But I can't seem to get my print drivers back or do updates. So I am suppose to do an inplace update or something like that, however my DVD drive won't read. So half way through it and I can't do anything more about it until I hear back from tech support. I honestly don't think I am suppose to be on it right now but oh well. I just can't upload any new pics or things until I hear from them. Which is a bummer because I want to share the pages I have completed on my baby album.

As soon as I can figure out how to upload files to share and as soon as laptop is better, I will work on sharing some of my files. I promise.

Wednesday, January 27, 2010

Baby Album

Now that multipage cutting works again. I can finally get down to business. When I design an album, in its entirety, I like to use the multipage function so that I can see the flow of the album and make sure it is appealing.

I am making a baby album for a friend of mine. She is not a scrapbooker. There are a few things to consider when making an album for a non-scrapbooker. First remember that the picture comes first. I love tons of embellishments and different size photos. I like being artsy with my personal pages. But for a friends album that I am not sure of their artsy side, I try to keep it simple and not too busy. You also have to remember that they may not also be into photography or have a photo editing software. They probably just use a point and shoot camera, center their subject on the screen and push the button. They probably take horizontal pictures and sometimes when they feel wild, they will turn their camera side ways and get a vertical shot. Now that they have taken their pictures, they will take them to their local Walgreens, CVS or Walmart and print doubles in 4X6 and maybe a 5X7. Oh, and don't forget to ask if there is a theme to their baby room. In this case the theme was princess and the room is done in pastels with focus on pink and purple.

You have to take all this information into consideration when creating an album for this friend. You are limited on photo placement and size (4X6 and 5X7) and most of your photo placements should be horizontal. You also want it to make it as easy for them as possible. They will probably print out their pictures, take some office tape, role it up so that it becomes double sided and place the picture in the album. They will probably write the date in the journal spot. And that is fine. You want to make the album that easy for them. Remember, they are not a scrapbooker and any more than that and they will tuck it away and your album will never be seen again.

This album will consist of 26 12X12 pages. 24 of them will be displayed as a double layout and one will be the title page and one will be the back page. Because I have 26 pages to do and very limited time (the baby was born 10/13/2009..I am already late), I had to do much of designing on the go. (Thank you Gypsy). But I also had to use 3 or 4 basic templates. I am switching up the elements on double layout per template. And the templates will be spaced out so that all the pages don't look the same back to back but the book will look cohesive because the use of a few templates will help the album flow. ( I hope I am making sense.)
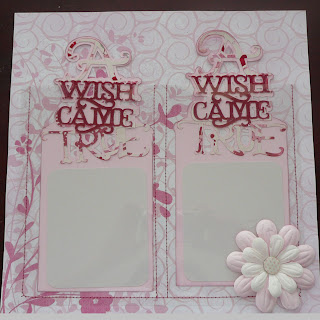
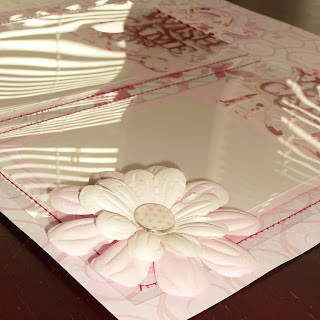


This is the title page. I made two pockets with large tags inside them. The pockets were made out of acetate teachers use for overhead projectors. For the life of me I can't think what that is called. It was sewn onto the pattern paper on three sides and down the middle. I then created the tags in my Gypsy using TBBM, StoryBook and GBS. There is one tag for mom and one for dad so that they can journal wishes for their new baby or blessings.


As you can see, the title page has two pages. One is the layout design and page 2 is the page that has the actual cuts. One of the items that didn't make it to the cut mat was the rectangle I used from GBS that served as a placement for the acetate pocket. I had it there so that I could design the tags the right size.

For the first template, I used a 5x7 picture on the left and two 4x6 on the right. I have 4 pages done with this basic template...well I will when I am done. I am currently working on the second page of this template. The frog prince is the theme of this one.
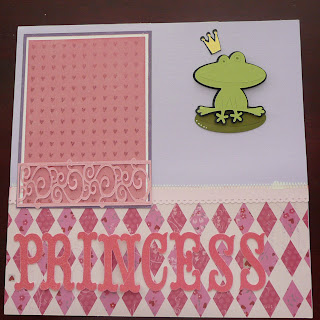
I didn't one to leave the photo placements a bare white spot so I used small patterned paper as place holders, then framed them twice.
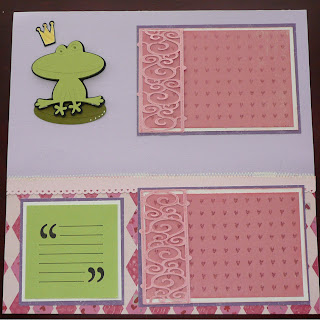

I added small decorative frames to the bottom. They are only glued down on three sides so that the picture will be able to slide onto the frame. I also put a little journal spot on the page for mommy to write.

Here is a picture of my Gypsy file. I used a 12X24 inch mat to do my design my double page layout. Each page has a different theme, frog, butterfly, crown, etc. But the last page of my file is the page that I actually do all my cutting and I only place things on the left side of the mat (the first 12 inches). When you do this, you can use a 12X12 to cut your design, even if you used 12X24 mat to design.


Some people like to cut out everything, for the whole album, before they start working on a page. I found that I prefer to work on one double page layout at a time. Designing probably took the longest. I had to create templates that met the criteria of photo sizes, come up with themes for each page, create new designs, etc. Now, all I am doing is cutting, grabbing the coordinating paper then gluing, stamping embossing. Over the next few days I will be adding pictures of the pages as I complete them. My plan is to do a double layout per day. Hopefully I can be done in the next two weeks so that I can give my friend her gift.

Sunday, January 24, 2010

Update for Gypsy dated 01/22/2010 work!

Hallelujah! Can i get an amen? I was on the infamous build 155 for the past few weeks. I missed the update to 158 that caused some new Gypsy owners to freeze up and send their Gypsies back to ProvoCraft. I believe it worked for all the existing users that stayed current on updating their Gypsies. But being stuck with build 155 has been frustrating to say the least.

I was in the middle of designing a 25 page album for a friend when I updated to 155. This album consisted of multiple multipage designs. To my dismay, build 155 broke the multipage feature. And I believe build 158 would have fixed it for me an not froze my G, it was pulled before I had a chance to download it.

So when PC sent out an update on a Friday afternoon, the beginning weekend of CHA, I was hesitant to do it. But someone said it worked for them. So I crossed my fingers and after a long day at a swim meet with my daughter, I decided to do the update. And it seems to have worked. I have not been able to cut a test file because we are at the final day of the swim meet and I won't be home until late this evening. But when I do a cut preview everything looks great. Even the preview of a multipage was bad on 155. My Gypsy is now on build 159. It did not give me the photo application that came with build 158. However, if you are currently on 158 and have the photo app. When you do your update, you will get build 160 and you will still have your photo app.