Sunday, December 19, 2010

Baby's First year

I can't believe I am almost to a resting point. I have done so many projects and really no time to relax and enjoy them. Well now I am R-E-L-A-X-I-N-G.

First up:
My Baby's first year album I took a class several years ago from Scrap-a-faire, hosted by Scrapbooks etc. Jana Wilson was the teacher. I could not find it at SBE site but I did find mention of it at Jana Wilson's website. I loved the class and have made several baby albums for friends and family. The concept is simple. Create a 12 month album that tracks a Baby's first year. And to make it simple, you have three templates that you repeat four times (3x4=12). You end up with twelve two page layouts.

This is the first album that I made for a stranger. A friend, that received one as a gift, requested one for her friend. So this is my first requested album and my first boy album. I am so much into bling, pink and ruffle that I really had to change my thinking to make this album. No matter, I still enjoyed making it.


Above is the front cover. A close up is available on the video below.

Above is just one of the three templates used to create this album. I used the following items to make this album. most were bought at Joann's and on sale.

  • DCWV Nana's Nursery Baby Boy
  • Core'dinations Cardstock
  • 8x8 Bind It All covers
  • Binder rings from Office Supply Store
  • Animal buttons from Michaels
  • Transparency from Office Supply store
  • Thread from Joanns
  • Cartridges: Nursery Tails (Cricut Imagine), Plantin Schoolbook and Gypsy Wanderings
  • Jolees Hotfix Crystals

Here is the video with a page by page look at the album.


Saturday, October 30, 2010

Menus....done

Can I just say I love my Irock? I bought one a couple of weeks ago because I saw it on the Cricut boards. I love bling so something that lets me add bling quickly and permanently was perfect for me. At the time that I bought it, I was not thinking of the menus that I needed to create for my friends wedding.

But after googling thousands and thousands of pictures of menus and getting the template from my friend...the bling just seemed natural. We had bling and ribbon on the invitations and we are trying to make everything cohesive. I took the pictures with my IPhone because...well because..I am just tired and didn't want to go downstairs and grab my camera. I am in my last week of training for my 60 mile walk and I am just plain tired.


Next up....Programs

Thursday, October 28, 2010

Weekly Challenge Circle Blog

So I have a million things to do before my walk and my trip to Puerto Rico. But I can't keep away from the Weekly Challenges at the Cricut Circle Blog. This week's challenge was to use at least two cuts, must be an original project (not something you made before)and must use some transparent element.


I used a window from Christmas Noel. I cut it in shadow, regular and blackout. I actually cut the transparency in blackout and sandwiched it between two regular cuts. I took this and put it on the shadow, done in black and then pop dotted the whole thing on a white blackout. On the white black out, I used my cuttlebug to give it a look of wallpaper then added a table and chandelier from French Manor. You can't see it (bad placement on my part) but I used yellow stickles on the chandelier for the candles...man I wish you could see it.

Thursday, October 14, 2010

I Walk

I did this layout for the Cricut Circle Blog challenge. I am so excited that they are giving away a Pink Expression with Pink Journey cartridge and an additional four cartridges! Can you believe it?!

So the challenge was to create a new project that used three of six elements (pink, flourishes, scallops, glitter, jewels or ruffles). I knew I wanted to do something about breast cancer because hello....this is Breast Cancer Awareness month, I am a survivor and this year I am participating in the 6o mile Walk for the Cure in Dallas. So I did a page on why I walk.

I really had to MacGyver this one. Because I waited to the last minute, I had to make do with what I had on hand. And guess what I didn't have on hand? pink ribbon. So I took beige ribbon and used one of my Ranger Dabbers and turned it pink. I really liked how it came out and I loved the added benefit of the ribbon stiffening up.

I aged my paper some by inking the edges with Tim Holtz Distressing inks. I used Tattered Rose on the 7x11 printed paper on the background. I also used it on the journal tag that I made with the Imagine More cartridge.

I used Adirondack Lights Shell Pink Dabber on the embellishment. I then went over it with Adirondack Lights Sandal Dabber.


I felt the glitter paper "for you" was a bit too bright for my page so I spritz it with Tattered Angels Chalkboard in Strawberry Shortcake. However, it just seemed to make it brighter. Oh, well, I was on a time crunch so I stuck with it.

I cut my letters for Walk in Bazzill paper and then distressed it with tattered rose also. I cut it twice and overlapped the layers.

I don't think I have ever scrapbooked this fast in my whole life.

Weekly Challenge 2


Well it is down to the wire so I am just going to post this and tomorrow I will post more pictures. I used a flourish that I made on my Gypsy, the word walk is the font from Don Juan, For you is from SweetHearts and the journalling tag is from the Imagine More cartridge. I used a pink ribbon for "I" . The for you is done in glitter paper, pink and beige.
Posted by Picasa

Sunday, October 3, 2010

Cricut Circle Blog Weekly Challenge


The Cricut Circle Blog just opened this weekend and Saturday was so exciting! Thank goodness I have an Iphone, so that I could keep up with all the prizes. The blog is open to everyone for a few more days but then it will close to circle members only. But if you interested, click here and you can check it out. The designers are amazing! But they also have two challenges, a Weekly challenge and a Monthly challenge. Here is my entry for the weekly challenge. It is a more decked out version of my calling card for the upcoming Circle event in Houston. I used French Manor to make the chair and the chandelier. I made the cushions for the chair from George and Basic Shapes. I used my Cuttlebug to emboss my white cardstock and it is matted on a 3X3 piece of black cardstock.
I used my Gypsy to make this. I always design first on my G and then use it to cut. I can't wait until my Gypsy can talk to my Imagine. Oh, the conversations they are going to have! Here is what it looks like on my G.
I label all my layers. It just makes it easier. My first layer is my design and this layer has every cut that I need to make. I zoomed it in a bit so that you could see it. If you don't have a G, this is not zoomed to the max. It can get bigger.


Then each layer behind it is an element of the design. Because I am making over 50 calling cards, I crammed as many chandeliers as I could on this page. I cut this on some silver paper that I got at Tuesday Morning. It is American Craft and a pack of 25 sheets of this silver metallic paper were in the pack. It is really thick so I used multicut of 2. My husband thought I was actually cutting metal when he saw my CE cutting. I won't bore you with the other layers, they look pretty much the same.

Have a great week!

Wednesday, September 22, 2010

A Sneak Peek...Imagine


Well I did it. I purchased the Imagine at the HSN launch on September 14th. I didn't feel any buyers remorse but at the same time I really couldn't justify buying it. But it is here and I LOVE IT! I love just putting one piece of white paper down on the mat and just cutting multiple colors and patterns...no making sure I have placed my scraps in the right spot so that they cut correctly.

Oh don't get me wrong, I will still use my E, especially since my Gypsy Girl does not work with my Imagine, yet. And I can't cut thick chipboard with my Imagine...it's a printing issue. But I was really excited about one of the carts I received...Best friends. It is the cutest cart ever!

So I used it to cut my twin and used StoryBook to cut the title for my new blog header. I haven't been able to take a proper picture of it. I need to get proper lighting. So until then, here is a sneak peek.


Saturday, September 18, 2010

Here comes the...

Wow has it been this long since I have posted? I have been busy in my other world, running. I am training for a 60 mile walk benefiting breast cancer. I'll post more about that later. But I am here to show you my latest creation: wedding invitations. I have never done them before and I was quite nervous but I think that came out great.

I learned alot about wedding invitations these past few months. I found some great places to get paper. One is The Paper Source and the other is California Paper Goods. I highly recommend both of them. The Paper Source opened a store in Houston so I will probably use them more...however I probably spend more in gas than I would shipping...so maybe I need to rething that idea. I got swatch books from both of them for the future. I plan to make more of these. I don't know for whom but hopefully someone soon. They were fun to make.


I also lined the inner envelopes with paper. Did you know there were A7 and A7.5 envelopes? I didn't until now.

Now I need to figure out how to make menus and programs. I can't wait!

Friday, April 9, 2010

Quick Bag and Card

I have been on a small hiatus and not doing much traditional scrapbooking. I have been working on wedding invitations for a friend of mine. I finally have my printer working but come Monday, my laptop is going to the doctors. But in the meantime, I thought I would share a small project that I did in thirty minutes.

I bought an egift card online and needed something to use as a gift bag. What better reason is there to use Tags, Bags, Boxes and More cartridge . I made the bag in both black and pattern paper. I thought it would give the bag more stability. I then used my Cropadile to make a small hole in the bag. My butterfly embellishment had a wire knot in the back and required me to be able to put it through the bag so that I could glue it to the bag.

After making this very small bag, I made a very quick card with my Forever Young Cartridge. I have to tell you, that I can't wait to use this card more often. I bought it before I became busy with my other projects but I can't wait to use it on more projects. Believe it or not, the card is only three inches high. I told you it was a small box. I wanted to make sure it fit into the box so I had to make it that small. I don't know if you can see if very clearly but I added some small pearls to her dress. I can't help but put bling on cards, no matter how small the card.

Saturday, February 6, 2010

Flight of the Butterfly

Well the good news is that my laptop seems to be better except I can't print. So I have to take some time to do a whole system restore. Maybe I can do it sometime next week. The bad news is that I have only finished one more page in my baby album. I went to a crop this past weekend but I really never get much done. I talk too much.

So here are the pictures of the second page using the template I created on the Gypsy. Now these templates do not take any welding or fancy stuff on my Gypsy. Which just proves, if you don't feel you have a creative bone in your body, you still have many uses for the Gypsy. You can use it to create templates and then you just plug and play your images. You will notice the similarities between this page and the frog page.


It is pretty scary when you have enough scrapbook stuff in your arsenal that you can create an album. I think all I bought was solid cardstock for this project. I love pearls on pages, flowers and any kind of bling. But remember, I am trying to keep this one simple. So I found these tiny flowers at the back of a flower drawer. They are metallic and I think the colors go well with DCWV paper that I used from the Sweet pack. Oh and by the way, if you also digital scrap, DCVW has digitized their papers! You can get this digital pack here. I am really contemplating buying them. I do a little digital scrapping. I would love to do more.
So most of the Sweet paper will be covered because they are just photo placement holders but I just don't like putting blank boxes but that is just me. I placed a pearl in the middle of each flower. I was going to do small brads but to me, brads take so much longer than self adhesive pearls.

Because the page looked so bare to me, I decided to weld two swirls together from Home Decor cartridge and cut it out and used the negative as a template for the pearl placements for the flight of the butterfly. I had to be careful because sometimes the negative was not wide enough to fit the pearl through the cut so I had to gently pick up the template in one corner to place the pearl.

Because the spacing of the butterflies and the photos was different for each page, I had to make to separate templates. But it helps to have the flip feature on the Gypsy because I just flipped the first one and then did small manipulations to make it conform for the second butterfly. And yup, I did it all on the template I created for this series of pages. I love that I can reuse a template over and over again. Especially on album for a friend. I have a girl, so you can't ever have enough pearls, flowers and gems. So the next, and last, page using this template has crowns. I see lots of colored gems and jewels all over the page. I just need to find the time. This weekend our goal is to paint the guest bedroom, the hallway and the guest bathroom. So it doesn't look like any scrapping will be done this weekend. Oh and I have to finally put up the Christmas decorations that have taken over my dining room.

Wednesday, February 3, 2010

Tuesday Treats is Open!

I am so excited! Tuesday Treats is open for business! And this weeks treat is amazing! Mya did a great job on her video and project. If you want to see a pro in action, hop on over to TuesdayTreats. Each Tuesday there will be a new designer sharing their talent.

On a sad note, my laptop is sick. :( I am online daily with tech support for windows vista. But I can't seem to get my print drivers back or do updates. So I am suppose to do an inplace update or something like that, however my DVD drive won't read. So half way through it and I can't do anything more about it until I hear back from tech support. I honestly don't think I am suppose to be on it right now but oh well. I just can't upload any new pics or things until I hear from them. Which is a bummer because I want to share the pages I have completed on my baby album.

As soon as I can figure out how to upload files to share and as soon as laptop is better, I will work on sharing some of my files. I promise.

Wednesday, January 27, 2010

Baby Album

Now that multipage cutting works again. I can finally get down to business. When I design an album, in its entirety, I like to use the multipage function so that I can see the flow of the album and make sure it is appealing.

I am making a baby album for a friend of mine. She is not a scrapbooker. There are a few things to consider when making an album for a non-scrapbooker. First remember that the picture comes first. I love tons of embellishments and different size photos. I like being artsy with my personal pages. But for a friends album that I am not sure of their artsy side, I try to keep it simple and not too busy. You also have to remember that they may not also be into photography or have a photo editing software. They probably just use a point and shoot camera, center their subject on the screen and push the button. They probably take horizontal pictures and sometimes when they feel wild, they will turn their camera side ways and get a vertical shot. Now that they have taken their pictures, they will take them to their local Walgreens, CVS or Walmart and print doubles in 4X6 and maybe a 5X7. Oh, and don't forget to ask if there is a theme to their baby room. In this case the theme was princess and the room is done in pastels with focus on pink and purple.

You have to take all this information into consideration when creating an album for this friend. You are limited on photo placement and size (4X6 and 5X7) and most of your photo placements should be horizontal. You also want it to make it as easy for them as possible. They will probably print out their pictures, take some office tape, role it up so that it becomes double sided and place the picture in the album. They will probably write the date in the journal spot. And that is fine. You want to make the album that easy for them. Remember, they are not a scrapbooker and any more than that and they will tuck it away and your album will never be seen again.

This album will consist of 26 12X12 pages. 24 of them will be displayed as a double layout and one will be the title page and one will be the back page. Because I have 26 pages to do and very limited time (the baby was born 10/13/2009..I am already late), I had to do much of designing on the go. (Thank you Gypsy). But I also had to use 3 or 4 basic templates. I am switching up the elements on double layout per template. And the templates will be spaced out so that all the pages don't look the same back to back but the book will look cohesive because the use of a few templates will help the album flow. ( I hope I am making sense.)


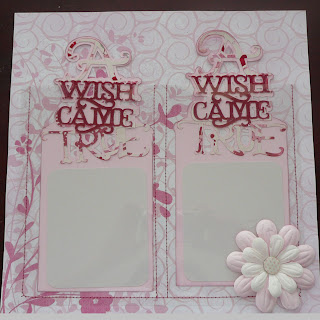
This is the title page. I made two pockets with large tags inside them. The pockets were made out of acetate teachers use for overhead projectors. For the life of me I can't think what that is called. It was sewn onto the pattern paper on three sides and down the middle. I then created the tags in my Gypsy using TBBM, StoryBook and GBS. There is one tag for mom and one for dad so that they can journal wishes for their new baby or blessings.


As you can see, the title page has two pages. One is the layout design and page 2 is the page that has the actual cuts. One of the items that didn't make it to the cut mat was the rectangle I used from GBS that served as a placement for the acetate pocket. I had it there so that I could design the tags the right size.

For the first template, I used a 5x7 picture on the left and two 4x6 on the right. I have 4 pages done with this basic template...well I will when I am done. I am currently working on the second page of this template. The frog prince is the theme of this one.

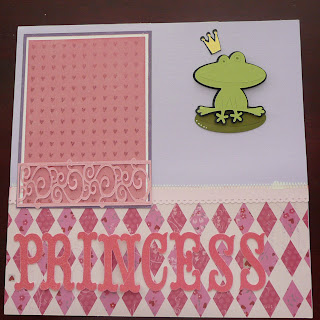
I didn't one to leave the photo placements a bare white spot so I used small patterned paper as place holders, then framed them twice.


I added small decorative frames to the bottom. They are only glued down on three sides so that the picture will be able to slide onto the frame. I also put a little journal spot on the page for mommy to write.

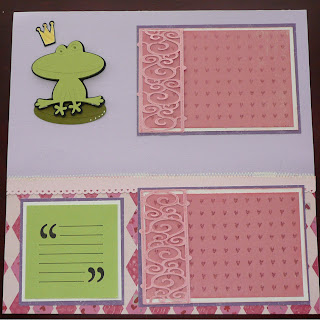
Here is a picture of my Gypsy file. I used a 12X24 inch mat to do my design my double page layout. Each page has a different theme, frog, butterfly, crown, etc. But the last page of my file is the page that I actually do all my cutting and I only place things on the left side of the mat (the first 12 inches). When you do this, you can use a 12X12 to cut your design, even if you used 12X24 mat to design.


Some people like to cut out everything, for the whole album, before they start working on a page. I found that I prefer to work on one double page layout at a time. Designing probably took the longest. I had to create templates that met the criteria of photo sizes, come up with themes for each page, create new designs, etc. Now, all I am doing is cutting, grabbing the coordinating paper then gluing, stamping embossing. Over the next few days I will be adding pictures of the pages as I complete them. My plan is to do a double layout per day. Hopefully I can be done in the next two weeks so that I can give my friend her gift.
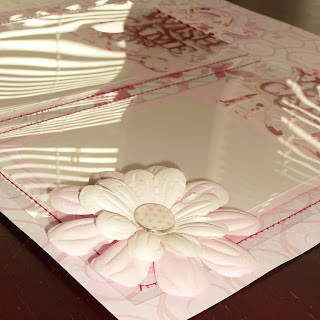
Sunday, January 24, 2010

Update for Gypsy dated 01/22/2010 work!

Hallelujah! Can i get an amen? I was on the infamous build 155 for the past few weeks. I missed the update to 158 that caused some new Gypsy owners to freeze up and send their Gypsies back to ProvoCraft. I believe it worked for all the existing users that stayed current on updating their Gypsies. But being stuck with build 155 has been frustrating to say the least.

I was in the middle of designing a 25 page album for a friend when I updated to 155. This album consisted of multiple multipage designs. To my dismay, build 155 broke the multipage feature. And I believe build 158 would have fixed it for me an not froze my G, it was pulled before I had a chance to download it.

So when PC sent out an update on a Friday afternoon, the beginning weekend of CHA, I was hesitant to do it. But someone said it worked for them. So I crossed my fingers and after a long day at a swim meet with my daughter, I decided to do the update. And it seems to have worked. I have not been able to cut a test file because we are at the final day of the swim meet and I won't be home until late this evening. But when I do a cut preview everything looks great. Even the preview of a multipage was bad on 155. My Gypsy is now on build 159. It did not give me the photo application that came with build 158. However, if you are currently on 158 and have the photo app. When you do your update, you will get build 160 and you will still have your photo app.

Thursday, January 21, 2010

Carry all your handbooks in your pocket

Ok, I admit it. I am a techno geek. I love everything electronic. Give me $100.00 and tell me I can either spend it at Best Buy or WhiteHouseBlackMarket and I will run to Best Buy. Tell me I can spend it anywhere and I will run to my local scrapbook store By Design Scrapbook Boutique . But a close second is anything electronic.

So it didn't surprise my husband in October when I found a way to use my IPhone for scrapbooking. After receiving my Gypsy and playing with it for a while, I realized that there are some images that I need the manual to figure out all the layers or features of a certain cartridge. The whole reason I bought the Gypsy is to leave my carts and manuals behind and create on the go.

The it donned on me. I always have my IPhone with me. Figure out a way to put them on the IPhone. So that is what I did. There are two ways to do it.

Option 1
Create a book mark in Safari or create an Icon on your Home Screen for each manual
  1. From your Home screen on your IPhone, hit the safari button
  2. Go to cricut.com
  3. Tap the information tab at top of screen
  4. Tap Cartridge Library Icon
  5. Scroll down to the desired manual (you may need to magnify your screen by using the backward pinch technique on your screen)
  6. Tap View in the handbook column
  7. Once the handbook comes up on your screen, tap the + sign at the bottom of your IPhone
  8. You can choose Bookmark if you want to only add a Bookmark within Safari (very similar to "add to favorites" on your Internet on your computer. OR
  9. You can choose Add to Home Screen
  10. Whichever you choose, another screen will pop up giving you the option to name the bookmark or Home Screen icon.
  11. The cursor will blink in the name field. Just type the name of your Cartridge in that field.
  12. Tap Add at the top right.
  13. If you chose add to Home Screen, your Safari will close and on your IPhone you will see a new icon for that direct link to that web page.
  14. If you chose add Bookmark, when you open Safari, hit the little book icon on the bottom left and a list of bookmarks will come up and just tap the desired bookmark.

This option works for both the Itouch and IPhone. However, you need Internet access to get to the handbooks. So if you have your Itouch and you do not have Internet access you won't be able to see the handbooks. If you have your IPhone, you can do this but depending if you are on the G network, E network or wifi will depend on the speed of which the handbook will load.

Option 2

Use a PDF Reader and download handbooks to your IPhone or Itouch. This option works well for both because you only need Internet access for the initial set up. Once it is set up, you will just open the application on your IPhone and then open the handbook that you want to see.

  1. Make sure both your device (IPhone or Itouch) and your computer are on the same wifi network (If you are doing this at home, more than likely your device is on the same wifi as your computer)
  2. On your computer, Create a folder for the handbooks
  3. Go to your Internet and go to the Cricut Cartridge Library
  4. Download the desired handbooks to your new folder on your computer (To do this, click view on column for handbook, the manual will pull up in PDF format, when the handbook pulls up, tap file on the left side of screen, then 'save as" and find your folder, name your file and then click save.)
  5. On your IPhone, open your PDF Reader application. (if you don't have one, go to the App store and search for PDF Reader and purchase. I think it was 1.99).
  6. When you open your PDF Reader you will see an IP address at the top of the screen. (Get your glasses on because it is small) it will look something like this: http://%20192.168.1.205:2000/
  7. Whatever the IP address is on your home screen of your PDF Reader, type it exactly as it reads on your computer in your Internet address bar.
  8. You computer Internet will go to a screen that says "IPhone Http Server"
  9. Tap the browse button, this will allow you to browse your computer and look for the handbooks you downloaded onto your computer earlier
  10. Once you select the handbook you want to add to your IPhone or Itouch, click the open button on the screen and your computer file screen will close and you will be back at the Internet site for the Http server.
  11. Click upload.
  12. The PDF version of the handbook will miraculously appear on your IPhone or Itcouh within the application.
  13. Repeat steps 8-11 until you have downloaded all the PDFs you want onto your Itouch or IPhone.

Remember, in order for you to get your handbooks onto the PDF reader on IPhone or Itouch, your computer and your device must both me on the Internet via wifi. Here is the link to applications official how to. But once they are on your device, internet access is no longer needed.

I hope this has been helpful. If you are more of a visual learner, let me know and I will do a video on how to do this. On a side note, I am in the process of updating my blog so you may see it change colors or see some wacky stuff. I can only do it in the morning between 4 am and 6 am, so sometimes I may need to leave in the middle of it. So I am asking for forgiveness in advance.

Saturday, January 16, 2010

It's all coming up blossoms...cherry blossoms that is


I was at the mall today and came across a wonderful outfit for my IPhone. Now you are probably wondering why I am blogging about my IPhone on my scrapping blog. Well it is because my IPhone is very much a part of my scrapping world.

You see, I save page sketches to it. I visit blogs and messageboards from it. I even store all my Cricut cartridge manuals on it. So it only stands to reason that it wears an outfit that compliments my Gypsy. When they finished dressing her, I showed the guys at the Zagg kiosk my Gypsy. They were in so much awe. They had no idea what it was but I saw the love in their eyes for her. They fell in love with her for her shear beauty.

If your mall doesn't have a kiosk, you can get them at zagg.com. And while you are at it, see about getting a franchise because they are busy all day long everyday. I have never seen so much action around a kiosk.

I am designing one for my laptop. I found another place to get a skin for it that is customizable. It is skinit.com . I hope to have it before the Houston Swarm in February.

I am back


Well the holiday season is over and I am sort of back to a normal routine. To say the least, I finally have some breathing room to make videos and show some of the projects I have made or in the process of making.

Many of you may have or are following Christmas with the Cricut, now called Calendar Girls Holidays with the Cricut. This blog is fabulous. Well over the holidays, I believe it was Mandy that did a project with shadow boxes. I simply loved it! I loved it so much that I made them for my brother and sisters. It is a picture taken at my dad's 80th birthday party. It was the first time in 10 years that one of my sisters has been back to Texas. So it was the first time in 10 years that we all got together. What better way to remember it than to give everyone a beautiful frame with a picture of the occasion? And think out of the box, you can do this for Valentine's day also for a loved one.